How Do You Identify Out-of-Focus Photos Quickly?

Elli Kim Content
Monday, September 28, 2026
The fastest way to identify out-of-focus photos is to check sharpness only on the part of the frame that matters, usually the eyes or the key detail, and to sort each burst by sharpness so the blurry frames sink to the bottom. For a small shoot, checking at 100% zoom or using focus peaking works fine. For a full wedding, photo culling software that scores focus on faces and on detail shots cuts that job down to reviewing the frames it flags.
The shots that slip through
It is Monday after a Saturday wedding. You have 3,000 frames on the card, and the gallery is due in two weeks. The portraits go quickly, because you know where to look: zoom into the eyes, check, move on.
Then you hit the details. Twelve frames of the rings on the invitation suite. Fifteen of the beadwork on the back of the dress. At normal size, every one of them looks sharp. At 100%, three are soft because the focus landed on the fabric behind the beads instead of on the beads themselves. There is no face to jump to, so you pan around each frame by hand looking for the sharp spot.
That is where most culling time quietly disappears. Not on the obvious misfires, but on frames that look fine on the screen and only fall apart when a client prints them.
Why blurry photos are hard to spot at normal size
A photo can look sharp as a thumbnail and still be out of focus. Your screen shrinks a 24-megapixel file down to a fraction of its size, and that shrinking hides softness. Three different problems also look alike until you zoom in:
Missed focus. The camera focused on the wrong spot, like an ear instead of an eye, or the lace behind a ring instead of the ring.
Motion blur. The subject or the camera moved during the exposure. Everything smears in one direction.
Shallow depth of field. Only a thin slice of the frame is sharp, by design. This is not a mistake, as long as the slice lands on the right thing.
The fix is the same for all three: stop judging the whole frame and check the one spot that has to be sharp.
5 techniques to identify out-of-focus photos quickly
1. Zoom to 100% on the spot that matters
This is the most reliable manual check. In Lightroom Classic's Library module, the Z key toggles between the full view and a 1:1 zoom. Zoom into the eyes for people and the key detail for everything else. It is accurate, but on a 3,000-image wedding it is also the slowest option, because every frame needs its own zoom and pan. Our guide to culling photos in Lightroom covers the settings that make this faster.
2. Compare frames from the same burst side by side
You rarely need to decide whether a frame is sharp in isolation. You need to know which frame in a burst is the sharpest. Lightroom's Compare view (C) and Survey view (N) let you put near-identical frames next to each other so the soft ones stand out against the sharp one.
3. Turn on focus peaking in a RAW viewer
Focus peaking outlines the sharpest edges in a frame with a colored overlay, so you can see where focus landed without zooming. FastRawViewer offers two modes, one for high-contrast edges and one for fine detail, and you cycle through them with the P key. It is quick for spotting a missed focus point, but it still means looking at every frame yourself.
4. Cull from the bottom up
Instead of hunting for keepers, do a fast first pass that only removes the clearly soft frames. Once those are gone, the second pass is a creative decision, not a technical check. This works best when something has already sorted each burst for you.
5. Let software score focus for you
Culling tools can now check focus automatically. Lightroom Classic's Assisted Culling filters by Subject Focus, Eye Focus, and Eyes Open, each with an adjustable threshold. Dedicated photo culling software such as Narrative, Aftershoot, and FilterPixel also scores focus as part of a broader cull. The difference between them is mostly in what they check when there is no face in the frame, and in whether they flag frames for you to review or remove them outright. You can see how the tools compare on our comparison page.
Why detail shots are the hardest photos to check
Most focus checks in culling software start with faces. That makes sense for portraits, but a wedding is full of frames without a clear face: rings, florals, the dress, the venue, a couple small in a wide landscape, a guest turned away from the camera. If a tool only checks faces, those frames either get no focus check at all or get judged on the center of the frame, which is often not where the subject is.
That gap is the one photographers kept asking us about. Summer, host of the Summer School podcast, helped represent Narrative at an event in Birmingham. She said some of the biggest feedback she heard there was some version of "What about a bird, or a plane?"
How Narrative identifies out-of-focus photos, with or without faces
Narrative checks focus at three levels, so you can stop zooming into every frame.
Scenes ranked by sharpness. Narrative groups a shoot into scenes of similar images and ranks every image in a scene, with the best frame at the top and the weakest at the bottom. Focus is part of that ranking, so the soft frames in a burst sink on their own.
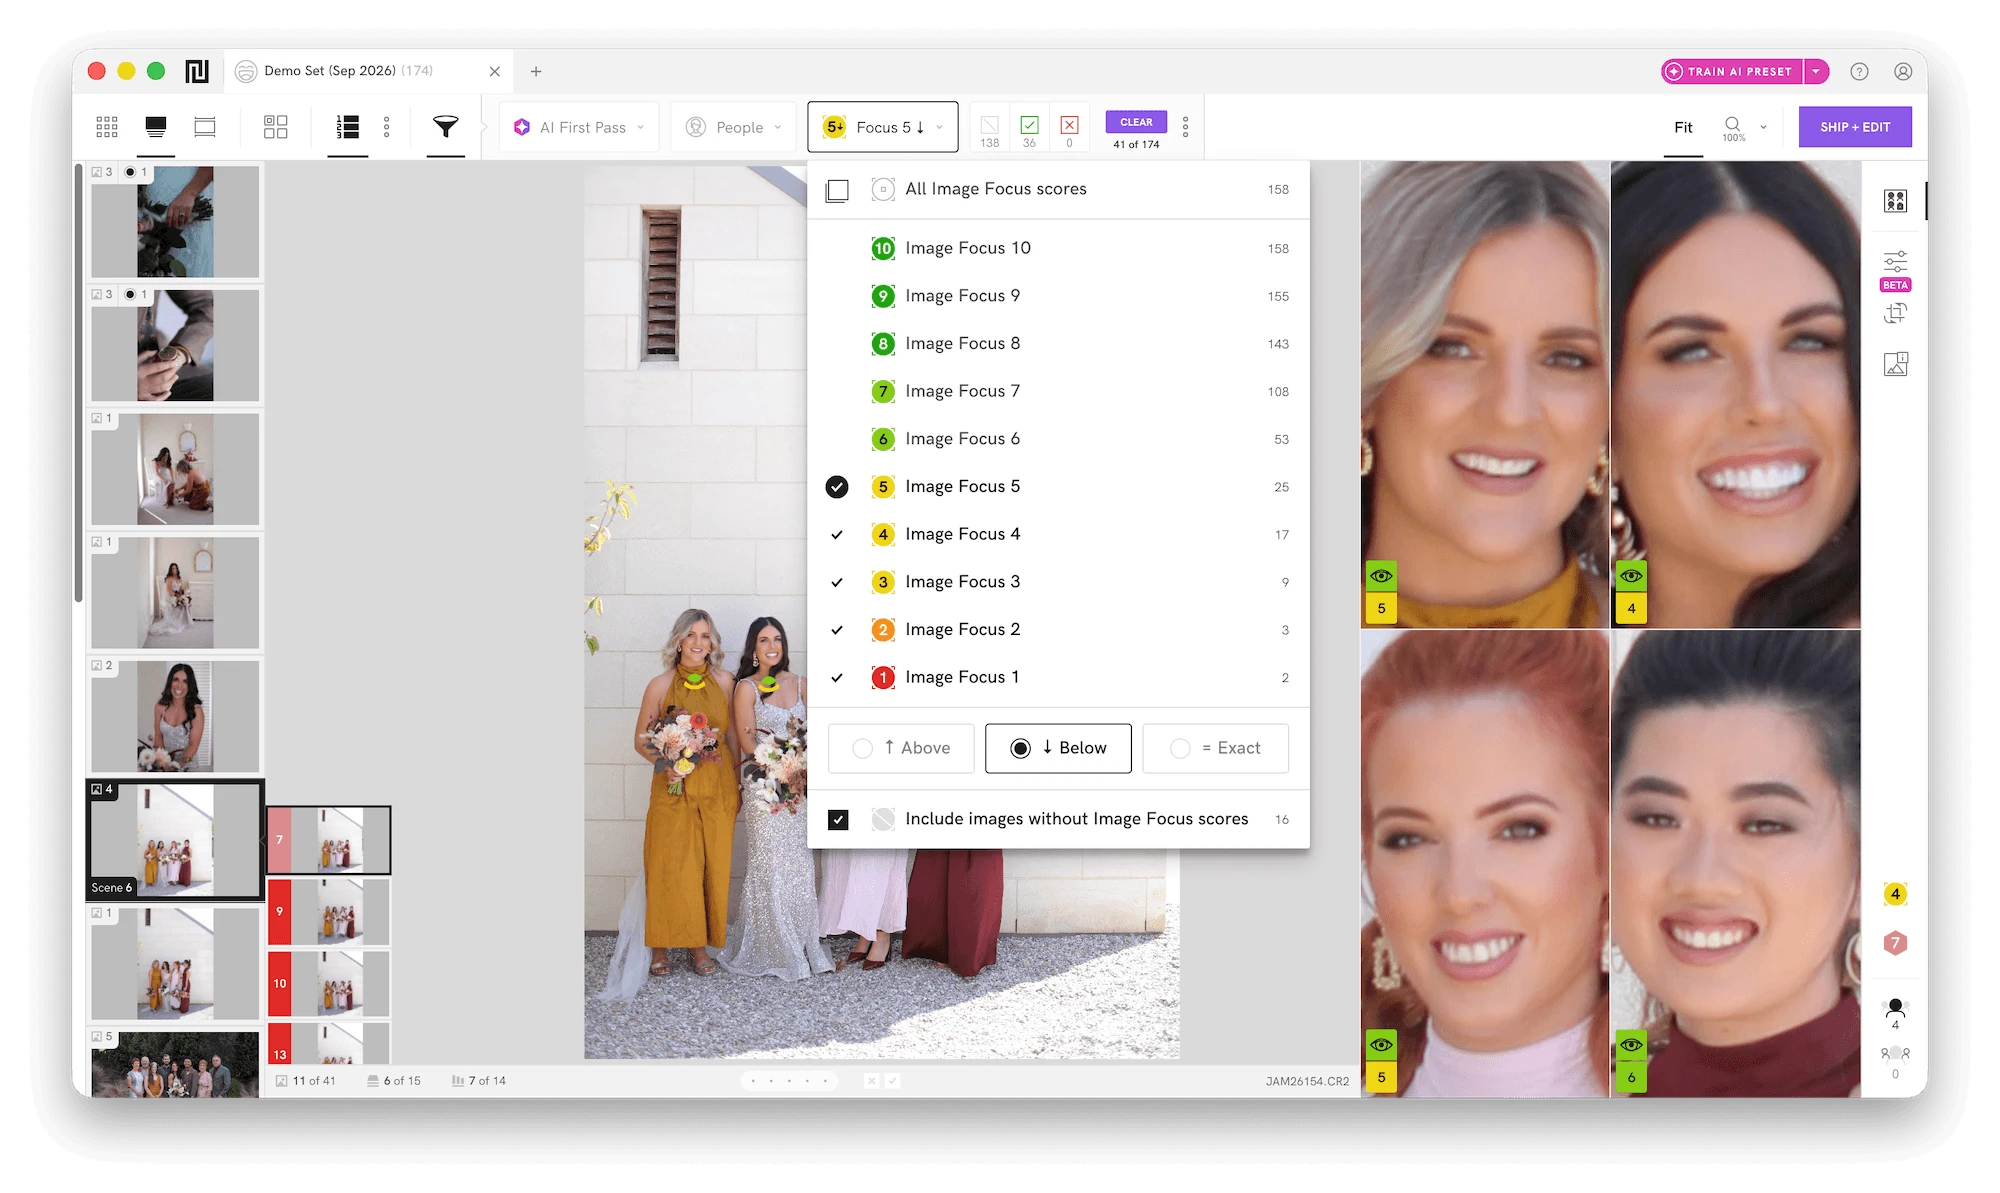
Face and focus assessments. For images with people, Face Assessments score focus and eye state for every detected face, shown as a color-coded indicator under each face in the Close-Ups Panel. Hover over it to see the score out of 10. You can also filter a whole shoot by focus score, for example to show only images scoring at or below a threshold you pick, and review just those.
Key elements for photos without faces. Narrative's key element detection, updated in September 2026, covers exactly these frames. When there is no face, Narrative works out which part of the frame matters most, such as the beads on a dress, a necklace, or a watch, and checks whether that area is in focus. In practice, that changes three things:
The Close-Ups Panel shows a crop of the key element instead of the center of the frame. It also picks up people whose faces are not visible.
Pressing the space bar zooms straight to the key element, and the zoom stays locked on it as you move through the next frames, even when the composition shifts.
Scene rankings now take the focus of the key element into account. In a set of three jewelry frames, the sharpest is ranked first and the softest is ranked last.
Photos without faces now get a focus score too, so detail shots show up alongside portraits when you filter by focus score.
As Narrative founder James Broadbent put it when demoing the update, the detail shots are where this matters most: "the images where the subject is small and in the distance and there isn't a face detected."
Everything is flagged, not removed. You see why a frame ranks low, and you still make every call yourself. That keeps creative control with you, including for the frames that are soft on purpose.
One honest limit. Narrative runs its focus checks on the JPG preview embedded in each RAW file. Some cameras, including some Sony models, save very small previews, which can make a face look sharper to the AI than it is in the RAW. If that is your camera, Narrative's help center recommends shooting RAW + JPG so the AI has a larger image to assess.
Should AI hide blurry photos or just flag them?
Flag them. Use software to sort and flag soft frames, and keep the final delete for yourself. Some soft frames are the ones with the best expression, and only you know which.
A fast workflow for identifying out-of-focus photos
Import the whole shoot. Narrative imports RAW files in seconds and works offline, so nothing waits on an upload.
Open Scenes View. Each burst is already ranked, so check the top frame first and skip the obvious soft frames at the bottom.
Check faces in the Close-Ups Panel. Look at the focus indicator under each face instead of zooming in.
Check details with the space bar. On rings, florals, and dress shots, let the zoom lock onto the key element and move through the burst.
Filter by focus score. Pull up the low-scoring frames in one view and confirm them as rejects.
Send your picks to Lightroom. Your selects go to Lightroom Classic with the soft frames already out of the way.
For more on building a full culling routine, see our photo culling FAQ.
Spend your time on the moments, not the zoom
Checking focus is necessary, but it is not the part of the job you got into photography for. Narrative users save an average of 253 hours a year across their whole workflow, and letting software do the first focus check is one place that time comes back to you.
Start a free trial of Narrative on the Ultra plan, no credit card required, and run your next wedding's detail shots through it.
Content